Step-by-Step: hotComm Startup
|
Document number: HCS.01
Copyright (c) 2003 1stWorks Corporation. All rights reserved. |
This document shows example startup screens for hotComm Standard/Pro.
Startup
- Start hotComm. Double-click the hotComm icon on your desktop (recommended).

Or ... Open your Windows Start menu, select Programs, select 1stWorks Corporation, select hotComm, and click hotComm.
Note: hotComm starts automatically at the end of the Registration Wizard. Also, You can set hotComm to start automatically when Windows starts (see the online User Guide).
- Connect to the 1stWorks Network.
Wait while hotComm Lite goes online (connects to the 1stWorks VNS server). When hotComm Lite is online, then you can connect to your target.
Am I online yet?
Look at the hotComm icon in the lower right corner of your Windows taskbar near the time. It is a headset. When the earphones turn red and blue, hotComm Lite is online. When the earphones are white, it is offline.
icon on taskbar hotComm is Online hotComm is Offline 


It may take time for hotComm Lite to go online, so please wait. If hotComm Lite never goes online, contact 1stWorks Support.
Where is the icon?
 Click here to see a screenshot.
Join a Room
To Join a Room:
- Get the Target server, Room name, and Password (if any) from the room owner.
Note: the target server is the first part of a hotComm Lite room address. The room name is the second part. For example, if the hotComm Lite address is relay:support, then the target server is relay and the roomname is support. - Double-click on the
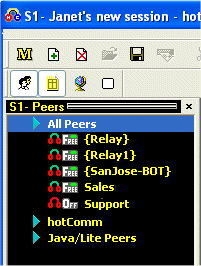
 ("Free") icon in front of the Target server name in your S1 Peer List.

If the Target server is not in your Peer List:
- Click the Add Person button (+Person).
- Enter the email address for the server.
- Click Search.
- When it is found, then click Add Person w/o Email Notification. The target server name then appears in your Peer List.

If the Peer List Panel does not appear:
- Right-click in the empty space on the bottom toolbar (to the left of Audio-On).
- Check Show Peer List Panel.
- Also, make sure that Toolbar, View Selector, Show Peer List Panel and Show Invited Peers Panel are checked, and that Simple control is not checked.
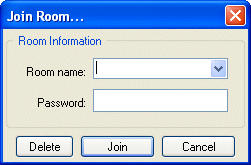
- Enter the Room name and Password (if any) in Join Room and click Join.

For example, to connect to the 1stWorks Support room, double-click the Free in front of Relay (which may appear in your Peer List as +Relay or {Denver-BOT}, enter Support, and click Join.
Connect to a Person
To connect to a Person:
- Double-click on the
 ("Free") icon in front of the name in your S1 Peer List.

- Wait until they respond to your invitation (you are inviting them to your session).
If the person is not in your Peer List:
|
Return to How to Install hotComm
Top