How to Install hotComm Lite
|
Document number: HLIN.004
Copyright (c) 2002-2007 1stWorks Corporation. All rights reserved. |
This document describes how to download, install and start hotComm Lite for the first time, and how to start it for Daily Use.
Download, Install, and Start
These are instructions for installing hotComm Lite:
- Download hotComm Lite.
Click this graphic to start copying the hotComm Lite installer (hlsetupx.exe) to your computer. Select Open or Run, not Save.
 Click to see example download screens.
Note 1: To ZoneAlarm Enthusiasts... You MUST grant hotComm Lite Full Permissions.
- Install hotComm Lite (hlsetupx.exe)
- Start the installation program
- If you selected Open or Run, the installation program starts automatically.
- If you selected Save, then find the installation file you downloaded and double-click it (hlsetupx.exe).
Note: If you saved the installer on your desktop, you might see an icon like this. Double-click it to start the installation: 
- If you selected Open or Run, the installation program starts automatically.
- Follow the instructions in the installation program. Take all the defaults. At the end of the install, click Finish to start hotComm.
- Start the installation program
- Register an Identity
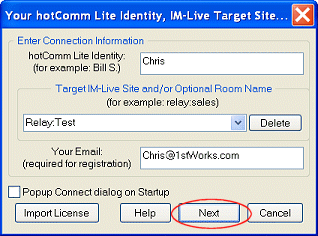
When hotComm starts, you see the "Your hotComm Identity" window. Enter the requested information and click Next.
Note: click Import License only if you are importing an identity/license that you previously exported from another hotComm installation (see How to Move or Copy a Lite License). Otherwise, click Next.

hotComm Lite Identity:
(ex: Bill S.)Enter your nickname, the name you want people to see when you connect. Target IM-Live Site and/or Optional Room Name:
(ex: relay:sales)Enter the address of a room you want to join. The synax is relay-server-name:room-name. For example, if the server is "relay" and the room is "sales", then the address is relay:sales.
You can enter this later.Your Email:
(required for registration)Enter your email address Pop up Connect dialog on Startup: Check this box if you want to be prompted for the roomname when you start hotComm Lite.
- Registration Activation Key
As of the 7.0 revision, hotComm Lite no longer requires that you type in an 8-character activation key. Activation is automatic. You may receive an email with an 8-character activation key, but you can disregard it.
- Start hotComm Lite for the first time
hotComm Lite starts automatically at the end of the installation. You see an empty hotComm Lite session window.
Wait while hotComm Lite goes online (connects to the 1stWorks VNS server). When hotComm Lite is online, then you can connect to your target.
Notes:
-
If you see a hotComm Proxy Settings Window, check Directly and click OK, unless you are sure that you access the Internet through a proxy server. In that case, enter your proxy server information and click OK.
-
If you see a License or trial expired message, that means you previously installed hotComm on your computer, and that used up the free trial period.
To see when hotComm was first installed, right-click the Smiley face icon on the bottom line and select Registration.
Am I online yet?
Look at the hotComm icon in the lower right corner of your Windows taskbar near the time. It is a headset. When the earphones turn red and blue, hotComm Lite is online. When the earphones are white, it is offline.
icon on taskbar hotComm is Online hotComm is Offline 


It may take time for hotComm Lite to go online, so please wait. If hotComm Lite never goes online, contact 1stWorks Support.
-
If you see a hotComm Proxy Settings Window, check Directly and click OK, unless you are sure that you access the Internet through a proxy server. In that case, enter your proxy server information and click OK.
- Join a room for the first time
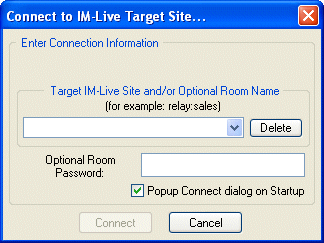
The Connection window pops up automatically. Enter your room address in the IM-Live Target area, enter the room password (if any) and click Connect.

Except, if you connect to your room by clicking a link on a website, then:
- Uncheck the Pop-up window on startup box if you usually connect to a room by clicking on a link on a website, and click Cancel.
- In your browser, click on the link now. You may see flashes of several windows, and then you should connect to the room through the hotComm Lite window.
- Uncheck the Pop-up window on startup box if you usually connect to a room by clicking on a link on a website, and click Cancel.
Daily use
- Start hotComm Lite

Double-click the hotComm startup icon on your desktop
- or -
Select hotComm from the 1stWorks entries in your Windows Start Programs menu. To do this, open Windows Start, select Programs, then 1stWorks, then hotComm, then hotComm Lite.
- Wait for hotComm Lite to go online.

When the earphones on the headset icon (in the lower right corner of your Windows taskbar) turn red and blue instead of white, you are online.
- Connect to the Target site.

When hotComm Lite goes online, it opens the Connect to Target window. Change the information if necessary, and click Connect.
Or, click on the room link on a website.
For more on how to use hotComm Lite, see the online hotComm Lite Help.
Note: If your computer accesses the Internet through a firewall, proxy server, or router, please see FAQ - Firewalls.
For customer support, see the 1stWorks Support website.
Top