How to Install hotComm
|
Document number: HCIN.2090002
Copyright (c) 2002-2003 1stWorks Corporation. All rights reserved. |
For Step-by-Step instructions with Screenshots, click here.
Download, Install, Register and Start hotComm.
These are the shorter instructions for installing hotComm:
- Download and install hotComm.
Click this graphic to start copying the hotComm installer to your computer:
When prompted, choose to Open or Run the installation program file (hcsetupx.exe). Click for Step-by-Step download screens.
Note: To ZoneAlarm Enthusiasts... You MUST grant hotComm Full Permissions.
- Install hotComm
The installer starts automatically when the download is done. Follow the instructions in the installer. Notes:
- Take the defaults.
- When prompted, select Yes to Add Icon to Desktop.
- When prompted, select No to Start hotComm on Windows Startup. (You can set hotComm to start automatically later.)
- Take the defaults.
- Register hotComm
Please register only once with the same email address. Do not re-register with the same email address. Do not register with the same email address on a different computer. If you want to use the same license on multiple computers, see 1 License, 2 Computers.
The registration wizard starts automatically at the end of the installation program. When it starts:
- Select the new user option and click Next.
- Enter registration information and click Next. Note:
- Enter a valid email address. Your hotComm Activation Key will be sent to this address.
- Choose your WebSite name carefully. It becomes part of your hotComm ezPeer and IM-Live addresses, such as website.ezpeer.net.
- Enter other information as requested.
- Enter a valid email address. Your hotComm Activation Key will be sent to this address.
- Review your registration information and click Next.
- Select Finish to start hotComm immediately or Exit to end without starting hotComm.
You may be asked to RESTART YOUR COMPUTER.
 Click for Step-by-Step registration screens.
Notes:
- The Next button is gray and does not work until you have entered all the information correctly.
- If the email does not arrive, contact 1stWorks Support to get your Activation Key. DO NOT TRY TO REGISTER AGAIN!!!!!
- (If you need to restart registration for any reason, double-click the hotComm icon on your desktop or select Register hotComm from the 1stWorks entries in your Windows Start menu.)
- Select the new user option and click Next.
- Start hotComm
At the end of registration, hotComm starts automatically.
Wait while hotComm goes online (connects to the 1stWorks VNS server). When hotComm is online, then you can coonect to others and accept calls from them.
 Click for Step-by-Step startup screens.
Am I online yet?
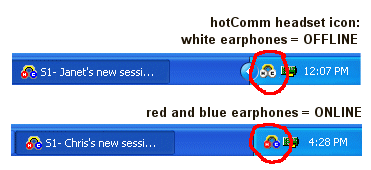
Look at the hotComm icon in the lower right corner of your Windows taskbar near the time. It is a headset. When the earphones turn red and blue, hotComm Lite is online. When the earphones are white, it is offline.

It may take time for hotComm to go online, so please wait. If hotComm never goes online, contact 1stWorks Support.
Where is the headset icon?
- Make a back-up copy of your registration file.
The file is named: HCRG.DAT. It is located in your hotComm\CFG folder. If you installed in the default path, it is: c:\program files\1stWorks\hotComm\CFG\HCRG.DAT.
- Explore the communication and collaboration feaures of hotComm. See hotComm Help.
See the materials available on the hotComm Support website.
Next Steps
Next steps are:
Top