|
hotComm CL is a Windows product. You can download and install it and use it in hotComm
rooms and events that allow hotComm CL.
This download includes hotComm CL and a utility that builds a shortcut that connects
directly to a specific room. If you do not want the room shortcut, see
Download hotComm CL.
How to Install hotComm CL with the Room Shortcut
To download and install
hotComm CL:
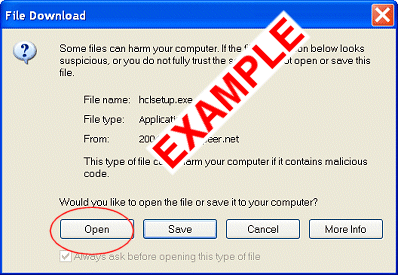
- Click the Download hotComm CL button. When you get the File Download window,
Select Open or Run, not Save.
.

|
Do not uninstall before updating.
Select Open or Run, not Save.
You MAY need to re-start your computer after some updates.
The current revision is:
(7.1Mb)
|

- Run the installer (hclsetupr.exe). If you selected Run or Open,
it starts automatically. Follow instructions in the installation screens.
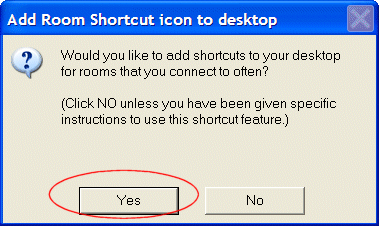
- When you are prompted to add a shortcut, click Yes.

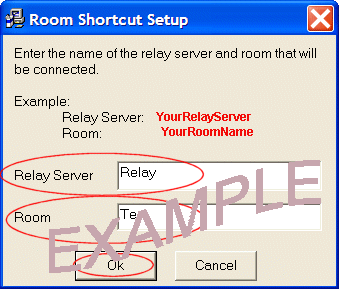
In Room Shortcut Setup:
For Relay Server, enter the relayserver your room is on, such as Relay3,
DLR1, etc.
For Room, enter the roomname you are given, such as: Support, Test,
etc.
Then click OK.

This adds a shortcut to your desktop labeled "Connect to roomname on relayserver".
When you are prompted to add another shortcut, click No.
- At the end of the installation program, hotComm starts.
If your privacy or security products challenge hotComm, always allow hotComm to
access any site.
- If you get a message saying you need to update, it usually means that you have a
copy of the old installer saved on your computer. Click here to update:
Update CL. Click here for About the Update Notice.
|
Security and Privacy product note
Check your privacy and security products to make sure that they allow hotComm to
access the Internet, and also allow you to access these addresses: hotComm.com,
ezPeer.net, 1stWorks.com. For information about some firewall products,
see Firewalls.
|
Test Audio and Connection
- Important! To verify that your computer will work correctly with hotComm technology,
click this link: Audio Test
and wait at least 15 seconds for the pre-recorded message. The hotComm CL password
is: test.
- Disconnect from the Audio Test room and connect to your room or webinar.
|
If you have audio problems, click this link to see
Trouble Shooting Audio.
|
Connect to Room or Webinar
To connect directly to the relay and room you entered into the shortcut, double-click
the "Connect to roomname on relayserver" shortcut icon.
Note: some people prefer to double-click the "hotComm CL" icon first to
start hotComm CL, and then double-click the "Connect to roomname on relayserver"
icon to connect to the room.
Otherwise, to join your room or webinar, follow the instructions given you by the
room or webinar organizer.
Note: if you have multiple hotComm products installed, this icon starts the one
you used most recently.
About the Update Notice
The Update notice means that your copy of hotComm is not updated to the revision
required for the room you want to join.
Your hotComm revision number is shown on the top line of your hotComm window.
If you get the "Update required" notice, you probably have an old copy
of the installer saved on your computer. (Windows is running the saved copy instead
of the new one you just downloaded.) To fix this, delete any saved copies of
hclsetupr.exe, delete Temporary Internet Files, and try again.
How to Delete Saved Installers
Find and delete all copies of the installation program (hclsetupr.exe):
- Open the Windows Start menu. Select Search or Find.
- Select Files and folders, and type
hclsetupr.exe as the filename. Click Search.
- Highlight all files that were found and press the Delete key.
- Close the search or find windows.
Return to How to Install
hotComm Auto Updates
Dial-up and Satellite users should disable hotComm auto updating, for speed reasons.
To do this:
- Start
hotComm CL.
- Right-click the hotComm headset icon in your Windows taskbar, and click About
hotComm CL
- In the About hotComm window, un-check Allow Auto Update and Allow
Auto Download.
How to Delete Temporary Files
Windows Control Panel
Internet Explorer AOL
Netscape
How do I delete Temporary Internet Files (clear cache)?
Instructions are provided for deleting temporary Internet Files (clearing cache) through
Windows Control Panel,
Internet Explorer,
Firefox,
Safari,
Opera,
AOL and
Netscape.
Updated 9/30/08
Return to How to Install
|

