|
hotComm User Guide
Document number: hcG
© 2026 1stWorks Corporation. All rights reserved.
|
Record Audio
hotComm Standard/Pro, hotComm Lite and hotComm CL can record audio.
For hotComm Standard/Pro, audio is one element of a Session Recording, and you can choose to record only audio. See Recording a Session.
hotComm Lite and hotComm CL can record audio only. To record audio through hotComm Lite or hotComm CL:

|
To start recording the audio in a session, click the Start Audio Recording button. |

|
To stop recording, click the button again. While recording continues, the button has a blue background.
|
Also see: Playback Audio Recording.
Recording Format
The recording is in the PCM WAV format.
Audio Recording Setup
To configure the recording:
- Right-click the Audio Recording button,
or
- Select Session and then Audio Record Timer Setup.
and click OK.
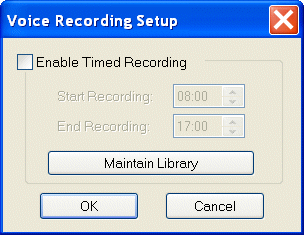
Audio Recording Setup
 |
Timed Recording
You can set the recording to start and end at specified times.
- Check Enable Timed Recording.
-
Use the timer arrows to set the times.
Note:
- You can set one timed recording.
- The time is taken from your computer's time settings.
- The recording timer is automatically reset at midnight, so the time period must be within a 24-hour period running from midnight to midnight, based on your computer's time settings.
- You can not set the timer for a future date. However, if you leave Enable Timed Recording checked, another recording will be made at the same time every day.
If Enable Timed Recording is set, you can also make other recordings at any time by clicking the Audio Record button. Note that if your other recording overlaps a the End Time for a timed recording, the recording will stop according to the End Time setting.
Maintain Library
Click Maintain Library to open the T'SCRIPTS folder, where the recording files are saved.
Top
|

