|
|
hotComm CL Instant Network Access Update
Instructions:
1. Download/Save the following .zip file
2. 'Run' or 'Open' the script with the
hotComm CL program closed.
3. Look on your PC's Desktop
4. You should have a *NEW* Desktop shortcut for hotComm 'Quick Connect' to use for startup.
You should now have almost instant network access.
5. Test it to launch the hotComm CL program. Confirm that you're connected almost immediately (1 -10 seconds)
6. Double left click your new (grey/red/blue colored)
'hotComm CL Quick Connect Client' to launch the program in advance of connecting through their website
- or with the room 'Target Site' address & room password.
How to Install CL
To download and install
hotComm CL:
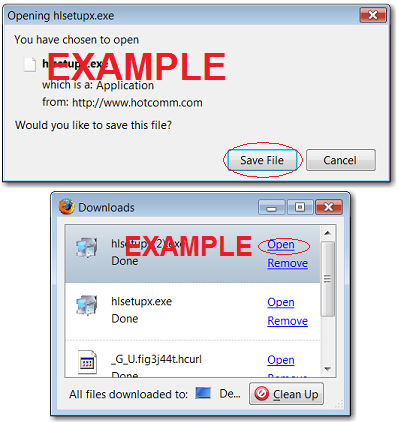
- Click the Download hotComm CL button. When you get the File Download window,
Select Open or Run, not Save.
.
|
|
Do not uninstall before updating.
Select Open or Run, not Save.
You MAY need to re-start your computer after some updates.
The current revision is:
8.00.012x
(7.1Mb)
|

- Run the installer (hclsetup.exe). If you selected Run or Open,
it starts automatically. Follow instructions in the installation screens.
- At the end of the installation program, hotComm starts. If you are a brand new user,
please enter a Nickname and valid email address when you are prompted.
If your privacy or security products challenge hotComm, always allow hotComm to
access any site (or grant permission for the software to "make changes" to your
computer settings). You can "Unblock", "Allow" or the equivalent when prompted by
your security software or firewall.
- If you get a message saying you need to update, it usually means that you have a
copy of the old installer saved on your computer. Click here for
About the Update Notice.
|
Security and Privacy product note
Check your privacy and security products to make sure that they allow hotComm to
access the Internet, and also allow you to access these addresses: hotComm.com,
OnlineTraderCentral.com, ezPeer.net, 1stWorks.com. For information
about some firewall products, see
Firewalls.
|
About CL PLUS
Only if you are a current CL user, then please read the following.
Introducing CL Plus - an innovative CL license providing unlimited lifetime access
to more powerful features.
- CL Plus users can choose multimedia recording in the industry-standard .wmv format
for both audio and charts where permitted instead of just audio.
- CL Plus users can create custom Abbreviation/Expansion messages to complement the
standard set. You can add your own custom .wav files and emoticons.
- CL Plus users have access to the hotScript feature to isolate transcript postings
to display only those from their preferred colleagues.
- CL Plus users will be highlighted in the Room List as a CL Plus user. Your lifetime
CL Plus license one time fee is only $65.95
so install the regular Upgrade then visit our order page and sign up now.
Your lifetime CL Plus upgrade one time fee is only $65.95
visit our order page and sign up now.
Return to How to Install
Test Audio and Connection
- Important! To verify that your computer will work correctly with hotComm technology,
click this link: Audio Test
and wait at least 15 seconds for the pre-recorded message. The hotComm CL password
is: test.
- Disconnect from the Audio Test room and connect to your room or webinar.
|
If you have audio problems, click this link to see
Trouble Shooting Audio.
|
Return to How to Install
Connect to Room or Webinar
To join your room or webinar, click the link in the instructions given you by the
room or webinar organizer.
Return to How to Install
About the Update Notice
The Update notice means that your copy of hotComm is not updated to the minimum
revision required for the room you want to join. To see your revision number, click
Help, then About hotComm CL.
If you get the "Update Required" notice, you probably have an old copy of the installer
saved on your computer, and Windows may be running a saved copy of our setup file
instead of the new one you just downloaded. To fix this, delete any saved copies
of
hclsetup.exe, delete Temporary Internet Files, and try again.
Return to How to Install
How to Delete Saved Installers
Find and delete all copies of the installation program (hclsetup.exe):
- Open the Windows Start menu. Select Search or Find.
- Select Files and folders, and type
hclsetup.exe as the filename. Click Search.
- Highlight all files that were found and press the Delete key.
- Close the search or find windows.
Return to How to Install
How to Delete Temporary Files (clear cache)
The instructions below use Windows Control Panel. For instructions for individual
browsers, see the Delete Temporary Internet Files FAQ
Windows Vista/Windows 7
- Click the Windows Start menu.
- Select Control Panel, (or Settings and then Control Panel).
- Select Internet Options, (or Network and Internet Connections and
then Internet Options).
- Under Browsing History, click the Delete button.
- In the Delete Browsing History window, check the Temporary Internet Files box, and
click Delete. (Note: you may check other items if you wish, but the only
one that matters for hotComm is Temporary Internet Files.)
- Click Ok
Windows XP
- Click the Windows Start menu.
- Select Control Panel, (or Settings and then Control Panel).
- Select Internet Options, (or Network and Internet Connections and
then Internet Options).
- Select the General tab.
- In the Temporary Internet Files section, click the Delete Files button.
- Do not check the clear Offline Content box. Click Ok.
- Close the Internet Properties and Control Panel windows.
Return to How to Install
Updated 3/2/12
|

